Showing posts with label crafts. Show all posts

Thursday, January 20, 2011

January Updates

Surprised to see me, aren't you? I know, I know, it's been forever since I've posted. I feel terrible about that, but as is the case for most people, life keeps getting in the way. I can't even begin to talk about everything that's happened since I stopped posting regularly, and I simply can't post all the pictures I've taken since the summer. I'll share a few January pictures, and hope that I'll get back into a more regular posting routine.
Laura enjoying our second snow of the winter...a bit out of the ordinary for our part of NC!
Moxie in the snow...crazy how much she loves it
As for me, I have red hair again.
Laura was recognized by the county school board as a "Shining Star" for having the kids that came to her birthday party bring books instead of presents, and then donating the books to her Kindergarten class. She was called up to the front of the meeting to receive her award...she was a little bit shy but did a great job!Laura and I after she got her award...I think she was done with smiling for pictures by this pointThe shirt I made for Laura for her 100th day of school
The back of the shirt

That's all for now...wish me luck as I attempt to wrestle my life into order and get back to blogging and running, two of my favorite things that have fallen by the wayside the last few months.  Oh, and yes, my background and blog name are totally different now....not sure if either of the changes will be permanent, but we'll see.  The background got lost by mistake (I accidentally deleted it and can't figure out how to get it back) and the old blog name needed revamping, and 3 Square was the best my non-creative brain could come up with.  It kind of applies, yet makes no sense at the same time, which is why I like it so much.  For now.

Saturday, April 3, 2010

A Quilt For Jared

Have I talked about Jared before here? I'm sure I have. He's a great guy; funny, smart, a true friend, and I have so many great memories of him from high school and beyond. He's been there for me in all of the big moments of my life, and the not-so-good and trivial moments too. Laura absolutely adores him. I always think about him when I listen to "The Longest Time" or do a 4 lane sweep while driving. One of my favorite things to do when I visit California is to meet him at Vincenzo's for some pizza.

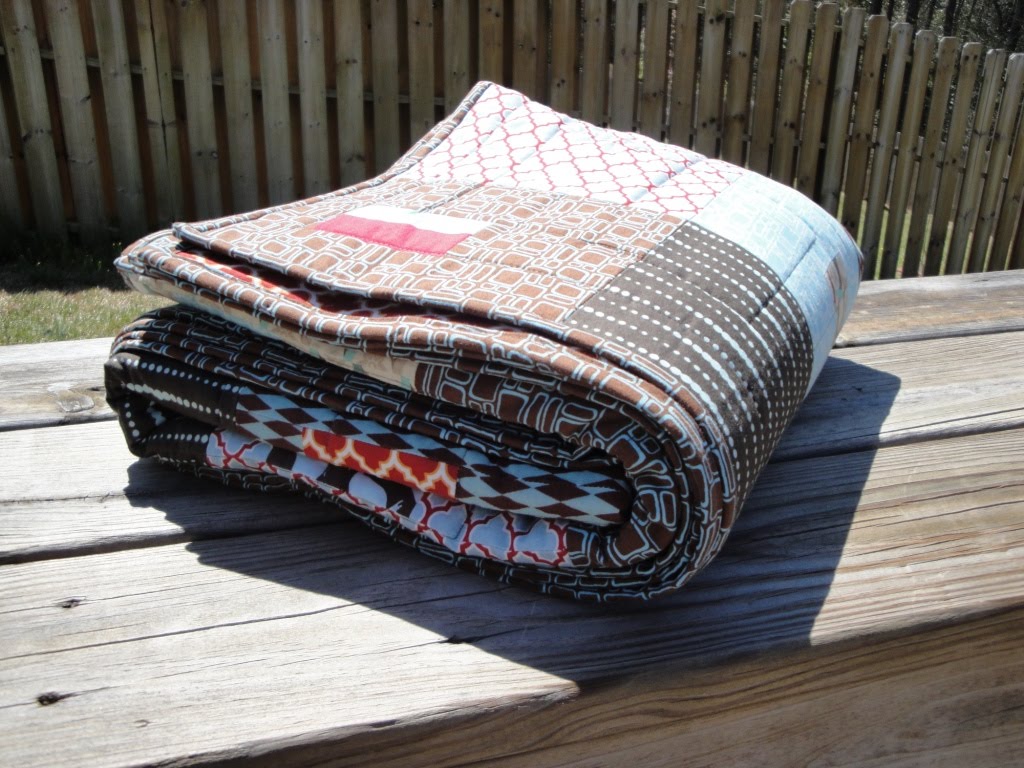
He's one of my very best friends, and in honor of his 30th birthday (which I'm embarrassed to report was back in March), I made him a quilt. He finally picked it up from the post office today, so now I can post pictures and share it with everyone! As shocking as it may be, I'm fairly certain this is the very first quilt of this size that I've ever completed. I've done a few smaller ones, and I've completed a few quilt tops, but this one has actual quilting and binding and everything. I was inspired by this quilt for the pattern, and it was definitely a challenge trying to pick "manly" fabrics. I fear I may have allowed some of my girly preferences show through, so hopefully he won't be too embarrassed to use it.

For those who are interested, I'll mention that I machine sewed the binding, with help from this tutorial and it turned out wonderfully! It was very easy and so much quicker. I don't know if I'll ever hand-stitch a binding again. Sorry, any future quilt recipients. You're going to be subjected to my laziness.
Note: It's hard to take pictures of a quilt when you have no one to hold it for youTurns out laying it down is much easierI didn't do the quilting, but it turned out nicelyThe label I made-I'm pretty proud of itLabel sewn onto the quiltAll folded up and ready to go to CA!

Sunday, February 28, 2010

Bubble Dress

The bubble dress is completed! As I said in my first post about the dress, I have a really hard time using patterns, and this time was no exception. The directions are well-written and the pictures are great, but that still wasn't enough to help poor clueless me. I was so stuck at the end on how to sew the bodice and skirt together in a manner that looked halfway decent, that I ended up having to trek up to our city's quilt store to get some advice. I happened to arrive right when a clothing construction class was finishing, and the instructor took a few minutes to talk with me. That's how nice they are there; she gave me one-on-one attention and some invaluable advice (for free) and seemed happy to do it!

The funny part was that the moment the instructor and I began looking at the pattern together and discussing it, the light bulb went off and I knew exactly what I was supposed to do. The trip wasn't wasted though-I got some great fabric, and an ego boost from everyone who admired the dress. Even better, the instructor told me she has used Oliver + S patterns in the past, and while they make some adorable clothes, the patterns are sometimes lacking in really detailing all the steps to take. So that made me feel better too.

The dress is a lot shorter on Laura than I expected (it is a size 5) so if I make it again, which hopefully I will, I'm going to try to make it longer. It doesn't "bubble" as much as Laura would like, but most people who have made the dress say the same thing. I might try a little bit less elastic next time to make it poof a bit more. As usual, my pictures stink and really don't do justice to the cute fabric (the blue is a tad darker in real life). I think it looks really cute on Laura!
Laura being forced to try it onStarting to enjoy herself more once I allowed her to curtsyThe buttons which also look cuter in real life

Friday, February 19, 2010

Updates

There's not much new here at our house. Our snow melted almost as quickly as it came, but sadly it didn't take the cold weather with it. Laura and I are desperate for some warmer weather! I'm already planning what clothes I want to make Laura for spring, and I've purchased a few patterns. Unfortunately for me, I'm such a visual person that I have a VERY hard time with patterns-no matter how many diagrams there are, it's still not enough. I bought this pattern from oliver + s (I'll make it without the scalloped sides) and I hope it will be just as cute as the pictures, despite my ineptitude with patterns. Stay tuned to see the finished product soon--I hope! I've also been trying to learn how to use my sewing machine to quilt, with terrible results. It would be so much faster and cheaper if I could figure out how to do it and quilt my own quilts, but I'm quickly accepting that it's just not meant to be.

But enough crafty talk, how about some pictures of Laura? I know that's the main draw here! I have a few from Valentine's Day so you can see just how much she enjoyed the holiday.
Heart shaped toast for breakfast (Mommy's idea)With her new dog that Daddy sent (with a little help from Mommy). She named it Cassie.Heart shaped sandwich for lunch (Laura's idea) We also had to use her heart shaped plate.

Friday, February 5, 2010

Friday Night Sewing

I've been feeling very crafty lately, and just wanted to share two things that I worked on tonight. The first is a baby quilt that I cut out a while back, and finally got all sewn together tonight. I think it looks so much better in person, because photographing quilts at night in a badly lit room just doesn't work out so well. It's made with some of my favorite Amy Butler fabrics, and I hope to get it quilted and listed in my shop soon. Unfortunately for me, I don't know anyone about to have a baby girl, so no one I know can benefit from it. The moral here is that my friends and/or relatives need to get cracking and provide me with a baby girl to sew for. The next thing I made tonight is a little Valentine's themed bag for Laura. I bought her a cute little stuffed dog for Valentine's Day, which had the added appeal of coming in a cute little gift bag. Sadly for me, the cashier at Target was so clueless and kept ringing up the dog and the gift bag separately, and would not be convinced otherwise that there was no way in the world the gift bag cost $5.99 by itself. She was very perplexed as to why the dog cost less ($4.99) but just did not get it that the set was $5.99 or the dog by itself was $4.99. The worker at the customer service desk was equally as confused, and I'm sure they both had a good laugh about the crazy lady ranting about the gift bag. They both were stunned by the high price, and didn't blame me at all for opting not to purchase the gift bag.

So the point of the story is that I came home from Target with probably a year chopped off my life due to aggravation, and with a stuffed dog that was no longer quite as Valentine-y without the festive bag. Not to be deterred, I whipped up a little drawstring bag similar to some I had made as Christmas gifts for the moms and sisters in my life. This version is littler but just as cute, and I know Laura will love it, since she loves anything that is even remotely like a purse, bag, or other carrying item. I have another quilt that's in progress, but it's not ready for it's close up yet. Hopefully I'll be back to share it in a few weeks.

Tuesday, January 12, 2010

Sewing News

Fair warning: this is another craft-related post, so if that's not your bag (baby), turn away now. I wanted to report that almost exactly 24 hours later, the entire quilt top of the Midwest Modern quilt is sewn together and ready to be quilted. Probably not by me though, since I'm not quite that experienced yet.

And the reason for all of the craftiness as of late? Behold:Yes, that's a new sewing machine, and the sewing enthusiasts out there probably won't bat an eye when I say that it cost $700. The rest of you however, are rolling your eyes or gasping in horror (possibly both at once). I'll defend myself by saying that I had birthday and Christmas money, it's a business expense, and I could have spent a lot more. A LOT MORE. There are some crazy expensive sewing machines out there. I also want to point out that my Kenmore that I used to use cost about $150 and I was on my third one.

My $700 bought me 534 stitches which works out to only $1.31 per stitch. Quite a bargain if you ask me. Maybe not such a bargain though since I'll probably only ever use about 3 of those stitches. Still, I can't get over the fact that there is a little computer that helps select your stitch, that it sews some of the nicest, neatest little stitches I have ever seen, and how quiet it is compared to my old one. I've gotten so much sewing done in the last few days. I finally finished up the backing to this quilt, which I started in January 2005, if I remember correctly. It's been shipped off to be quilted. The Midwest Modern quilt was started in December 2008 and is now done and ready to be quilted. See below for the picture which you'll think is the same picture from yesterday, but isn't.So I'm not sure if I have my new machine to thank for all of my current motivation and project finishing, but I suppose I'll give it some of the credit. Next up: about 50 other half done projects and many, many new ones.

Monday, January 11, 2010

Midwest Modern, The Quilt

Remember the fabric I got for my birthday in 2008? Well it's mostly turned into a quilt! Can you believe it that in just a little over a year I actually got most of it done? Me neither! It turns out that when you actually sit down and sew for more than 5 minutes at a time, you can get some real work done. A good chunk of the work was actually done in the last week, so I'm hoping if I keep up this pace I may get several old projects finished this year, and maybe even a few new ones!

I don't know if you can tell in this picture, but it's not completely sewn together yet-it's all in big sections ready to be finished tomorrow when it's not midnight and I'm not so tired. But most of the work is done and I'm so happy, because this was the weirdest quilt I've ever worked on. I will never, ever use this pattern again! There wasn't really one piece that was similar to any of the others, which made cutting the fabric nearly impossible, and keeping track of everything was a disaster. Most of it was strewn all over my couch for the last few months, so being able to sit on the couch again is an accomplishment in itself.I really have no idea what I'll do with this quilt once it's done. When I started it, I envisioned it as a more grown up quilt for Laura's bed. Now I'm not so sure. It definitely doesn't say "Laura" to me. Any suggestions?

Thursday, January 7, 2010

Sew Laura, Sew!

Laura and I celebrated Christmas this year in California, with our families. It was a wonderful trip, one that I should probably write about, but at a later date. Right now I wanted to share pictures of Laura with one of her new toys.
One day, well before her birthday, Laura and I were at Joann's where she spotted a sewing machine "just for little girls!" It was small, partly pink, and extremely cheap looking, and she just had to have it. It cost a mere $24 and I could have bought it for her right then and there, but she told me that she was going to put it on her birthday list. I was all for that plan, thinking that delayed gratification was something good for her to learn about. I went back later, under cover of darkness, and snatched it right up. I hid it in the garage and completely forgot about it. Seriously. In fact I so totally forgot about it that a few weeks after her birthday, when Laura saw a bag in the garage and asked me what was in it, I had to open the bag to find out (and then quickly snap the bag closed while squeaking out "nothing!" to my very curious daughter).

In the end, the sewing machine was under the tree as a gift from Santa. Laura opened it and was thrilled and told me later that it was just what she always wanted. We finally took it out of the box a few days ago, put in the necessary batteries, and fired it up. She has to use her hand to work the pedal since her legs aren't long enough, and it is loud and I'm fairly certain it will break any day now, but she loves it. Loves it. And I love seeing how happy she is, and that she, the wild and crazy child who jumped three feet in the air today over the mention of a juice box, can sit calmly and sew. She has big plans for a blanket for her babies, but right now is content to just sew in a straight line on the fabric that Santa also provided. Her complete and utter satisfaction with her new toy, along with the shock and surprise of getting just what she wanted was pretty much the best part of my Christmas this year. How DID Santa know to get it for her?
This is my favorite picture. Look how serious she is!

Monday, December 14, 2009

How To Make A Stocking In 43 Minutes

In the Army Man's family, the stocking is one of the most important parts of Christmas morning. It's the first thing opened (such a foreign concept to this girl who always opened hers last!) and it is always stuffed full of goodies. Since the Army Man won't be with us for Christmas this year, I realized that his stocking would have to be shipped to him. But that's a risky endeavor, and I just couldn't stomach the thought of mailing his precious childhood stocking halfway around the world. I mean look at it:
That thing is simply irreplaceable. The Army Man loves his stocking and I would never forgive myself if something happened to it. So one day, less than an hour before picking Laura up from school, I decided to make him one. Yes, I know I could have just bought one at Target for $5. I even saw those stockings with my own eyes when I went there to buy gifts to put in the stocking I made. But I had this ugly Christmas fabric laying around and no other use for it. Plus, like women who cook for people as a sign of their love, I craft for people. So making a stocking for the Army Man is the Claire equivalent of grilling a delicious steak and mailing it to him. Which really wouldn't be a good idea. Hence, the stocking!

Making this stocking was quick and easy. The only thing that slowed me down was me taking pictures of my progress, because right when I started, I decided to write a stocking "tutorial" in case any of my readers are inspired to do make one. If you're an experienced sewer, please hide your eyes from my silly instructions. If you're a novice sewer, please feel free to be wowed by my excellent sewing skillz.

To start out, I simply folded my fabric in half, right (patterned) sides together. I had a yard of fabric on hand and that was plenty to also make a lining for the stocking. I used the stocking I already had as a template, but you could certainly just cut one free hand. Place the stocking on the fabric, and cut around it.Do this twice; once for the outside, once for the lining. Since your fabric was folded in half, you'll end up with 4 cut outs of the stocking. Next measure the approximate length of the top of the stocking, double it, and add about two inches. Use this measurement to cut a length of fabric that is 2 1/4 inches wide and as long as you came up with through your higher math. In my case, mine was about 19 inches long (8.5 plus 8.5 plus 2). If you're interested in making a loop to hang the stocking with, cut another strip of fabric that is 3 inches wide and about 16 inches long.Now take these strips to your ironing board and iron them in half with the wrong (non-patterned) side facing in. Open them back up and fold the sides in to meet that center fold. Refer to picture below. Do this for both strips.
See what I mean? Now, look at your loop fabric. Chances are you'll probably need to cut a few inches off of the length. I think 16 inches ended up being too long, but I can't remember what I cut it down to. Fold it in half and see if you like how long it is. If not, cut off a bit. Don't worry how much, just eyeball it. For JUST the strip for the loop, fold down the end just a bit, and iron it. Clip the corners. Do this on both ends. For the hanging loop, fold the strip in half lengthwise and sew along the open edge to close it. Then fold the strip in half to form the loop, and sew the end. This is going to be a pretty thick bit of fabric to sew through, so make sure you have the correct needle on your machine. Your finished loop should look like this, only better, because my pictures are terrible:Now it's time to sew the stocking. This is so easy, and so fast. With the right sides together, sew a 1/4 inch seam all the way around the stocking, leaving the top open. Back-stitch at both ends. Do this for both the outer part and lining. So you have both sections done. Turn them both right side out and iron the seams to your liking. Then turn one back inside out, and shove it inside the other stocking. Mess with it until it's good enough. You should be seeing the patterned side on both the inside and the outside.

Now it's time to do the trim around the top. Take the trim piece and place it so that it's folded in half and encasing the raw edge of the top of the stocking. Pin it in place.You should have plenty of extra trim. Since you only want it to overlap a little bit, cut one end off diagonally and fold and iron the other end like we did for the loop fabric. Overlap the two ends nicely, and pin in place.Now sew along the entire trim, about 1/4 inch from the edge. If you feel so inclined, you can even use coordinating thread.
Next position the loop to your liking and sew it in place on the inside of the lining.
Lastly, take an awful picture because you just realized you're late to pick you daughter up from school. Fill the stocking with goodies and mail it off to your husband, praying that it gets there in time. But be smart enough to not mention what you actually put in the stocking, just in case he reads your blog.Now that my tutorial is posted, I'm not sure how much use it will actually be to anyone. I realize now I didn't take the right pictures...I took so many pointless ones and totally skipped some crucial steps. But I've always wanted to give writing a tutorial a try, and I have to admit it was fun to attempt to share my idea. I also want to say that looking at that final pictures makes me realize that looks nothing like a stocking but rather a misshapen boot or something. Luckily for me my recipient was a man, and the Army Man at that. There's no way he'll notice what it looks like. He likely won't even realize that I made it.

Thursday, November 19, 2009

Modern Women Of Sewing

Oh, how I wished closer to New York and could attend this Modern Women Of Sewing event. I suppose I am somewhat modern, and I do sew after all. Those three presenters? Well, they're awesome and hip and downright famous in the modern sewing world. And they'll be speaking, for free, at a library! Even though I can't attend, I'm pretty tickled to see that these busy women are participating in such a great event. I wonder how likely it is that they will come to North Carolina next.

Monday, September 28, 2009

Serging Ahead

Want to see something that’s intimidating to even a somewhat experienced seamstress?
That’s right, a serger. I’m terrified of it. Or correction, I was. Until I saved up my pennies, bought a relatively cheap one (don’t want to make my cheapo sewing machine from Sears jealous) and decided that there is absolutely no reason to be afraid of a machine. If even it does have two needles, four spools of thread, 2 knives to cut the fabric (and possibly your finger), 2 owner’s manuals and 2 instructional DVDs, and a host of other weird accessories.

A serger is a type of sewing machine, I suppose. It doesn’t sew just a straight stitch; you still need a traditional sewing machine for that. This is the machine that makes clothes look really professional. If you’re wearing a shirt right now-and I hope you are because I prefer my readers not be topless-then you can check out the hem of your shirt and see what I mean. All that stitching, that looks all complicated and fancy-it’s what’s keeping the fabric from unraveling when it’s washed. And now, that’s a look I can achieve on my dresses. It probably won’t be quite as nice as some manufactured clothes (I’ve heard some sergers have up to 10 different threads going at a time!!) but I made a test dress while using it, and I’m really pleased with the results.
Look at that stitching!

It also goes ridiculously fast, and so far it’s definitely cut down on my sewing time. Although having to go back and forth between my two machines is something I’m still getting used to, and I don’t quite have it all down to an exact science yet. I'm sure if I videotaped my sewing process and sped it up, it would be quite entertaining. Here's to hoping that soon I'll be churning out dresses like crazy!

Tuesday, September 1, 2009

Vogue!

Poor Laura. She's been forced to be my model these last few months as I've attempted to take cute pictures of my creations to put on my Etsy site. It's really been tough on her-you know how much she hates the spotlight. And how much she detests getting her picture taken. Oh wait, that's me I'm thinking about! In reality, Laura has absolutely loved getting to model my clothes for me, except for the times I interrupt her during an important task (usually coloring). I usually get a few cute pictures that I can't post on Etsy but seem too good to waste, so I thought I'd post a few of them here. The first two are of my latest shirts.

All of these poses are her own doing, naturally.
I love her faux surprise in this one.Oh so sweet. Yeah right.
I'm sure I'll be back soon with more, seeing as I don't think Laura will EVER tire of getting her picture taken.